Coleslaw Chicken Wraps

This is perfect for lunch or a light supper, dinner, whatever you call that evening meal in your home. It is quick and easy to make and if you have your chicken precooked and sliced, it is even quicker to make when you are in a hurry.


I found this recipe on On the Homefront website. Actually, Nancy posted a link to it on her Facebook page and it popped up in my news feed and my mouth began watering.

I was a little concerned when I saw the recipe called for a poppy seed dressing. Since poppy seeds tend to show opiates in drug testing, I knew I would not be able to make the recipe with this dressing. I asked Nancy about substituting the dressing and she recommended any creamy dressing. So that is what I did; I found a bottle of Nature Valley Creamy Parmesan Dressing while grocery shopping. My husband loves Parmesan so I knew this would probably work for us. To me, Parmesan has a strong taste so I used a little ranch dressing to cut the strong cheesy taste. OH. MY. WORD. The two mixed together is AWESOME. My husband told me this recipe reminds him of the Hawaiian Chicken Sandwich at the sandwich shop in town. ~ That's a good thing!

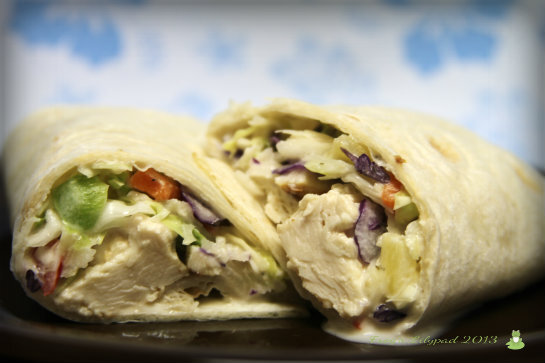
Hint, Hint, Hint... be sure to DRAIN your pineapple very well or you'll have a juicy wrap. ~See my photo~ Also, I had on hand the fajita size tortillas for fajita night. Burrito size tortillas would work better.

         
 Coleslaw Chicken Wrap

1 bottle    Creamy Parmesan Dressing
1 cup       Ranch Dressing
2 lbs       Chicken breast
1 package     Coleslaw mix  (14oz)
1 can       Pineapple tidbits, drained
1             Sweet red pepper, finely chopped ( I used a green pepper)
8            Tortillas
Salt and Pepper to taste

Marinate the chicken in 1 cup of the dressing for one hour. (I used only about ½ cup of the Parmesan dressing because my chicken pieces were small) Drain and discard the marinade. Lightly coat your grill with oil and grill the chicken for 6-8 minutes per side or until done. Let stand for 5 minutes before slicing.

In a large bowl, combine the pineapple, coleslaw mix, red/green pepper and the remaining dressing (½ cup Parmesan dressing and ½ cup Ranch dressing); toss to coat. 


Divide among the tortillas; top with chicken. Roll up tightly and chow down. :)

Planning a New School Year - 8th Grade

It has been exactly one month since we finished our school year and things around the house have slowed down a bit. Over the past month, I have been busily working on the hardest part of school... curriculum choices.


From the beginning of this journey, I always knew there would be the possibility of Jamie  entering the ninth grade in a school. Since we moved, that possibility will more than likely become a reality. So this year, I want to make sure Jamie will be where he will have an easy transition for the ninth grade. If he attends a school, good; if he finishes up at home, great. Either way, I want him beyond prepared for college.

I am going to start with the easiest choices for me because we have used them in the past and have really enjoyed learning with them.

Teaching Textbooks ~ I really can not say enough about this program.  This program is well worth the money when you see your child quickly understanding a math concept. If you have not read my REVIEW on this wonderful program; run right over and give it a read.

Spelling Power ~ This is another no-brainer for us.  It is something that works for us and we are truly happy with it. I love the idea of not studying words you already know how to spell. You can read about how I use this program HERE.

Vocabulary ~  I teach vocabulary using words in our History and Science lessons along with Wordly Wise 3000.  We have been using Wordly Wise for several years now and really enjoy it.

Critical Thinking~ We liked Mind Benders last year, so we will be using book six this year along with Word Benders from Critical Thinking .

History and Geography ~  We will be continuing our study of American history through All American History Volume 2 from Bright Ideas Press.  Jamie loved this program and that made me happy. We are both excited about picking up where we left off and can not wait to get started.  You can read my REVIEW for volume 1. For Geography we will be using a Trail Guide to U.S. Geography. We will also be doing a state study for Montana.

Literature ~ We will be reading classics again this year. I've been filling my Kindle with free downloads and I can't wait for Jamie to get started with some of my favorites from when I was in school.

Bible Study ~  We have tried a curriculum in the past and it was fine while Jamie was younger. Then we tried a Bible study book and he did not really care for it.  Jamie and I have always enjoyed just reading through a book of the Bible.  This year,  I will be adding journaling to our study. This is something that I do for my personal Bible study time and have really learned so much about what I've read. I think this will be a good thing for Jamie. It will help him to really focus on what he is reading and hide God's word in his heart.

World View ~  World view is new for us and I think it is a perfect study for Jamie. We will be using Christian Theology and Ancient Polytheism and World View from Brimwood Press. We started this in May and really liked what we studied and are eager to begin again in August.

Science ~ We were really bummed out with science last school year, and Jamie asked if we could just go with something that had short chapters with lots of pictures. He's like me! So I decided we would go with Abeka for Science. Abeka is a really strong program but it can become very rigid if you let it. So, I purchased an older edition of the Matter and Motion and Health books. After Jamie looked through it, he mentioned how some of what he tried learning last year is covered in this particular edition of books. I told him that it was okay and maybe we need a little review to help him remember what he studied last year.

Grammar and Composition ~  We are going with Daily Grams and we are also using Jump In for writing. I wanted to fall back on Abeka this year for grammar, but when I listened to a former college English teacher talk about how all the dead horse beating with grammar that Abeka does and not enough teaching of writing, I felt urged to go with something else. So, Daily Grams it is.

4H ~ We have joined our local 4H. This year, Jamie will be working on a small engine project and his rabbit project. We are looking forward to learning all we can, so Jamie can enter the fair next fall.

Books have been arriving in the mail, and I am working on lesson plans with a starting date of August 26th.  I am excited about this up and coming school year, we have some neat places we are planning to visit to help in our learning.

Edited 8/5/2013 to change grammar from Abeka to Daily Grams.

Family Goings-On

We've been a little busy the last couple of weeks.  Today, I'm sharing several pictures of what we have been up to.


 We have been rodeoing...


We celebrated our nation's independence...


We were sadden to hear of the 19 firefighters killed while doing their job in Arizona. We mourn the loss of one of those men, Dustin DeFord who was from Ekalaka.  This is his funeral procession going into town for the funeral.


Our favorite ranch animals have been seen again...


We've driven into the clouds...


I fell in love with my $5.00 thrift store find. She sews like jewel!


We visited Devil's Tower again; this time really enjoying the park 
with a nice hike around the tower.


We've been dodging ferocious storms...


I have put my creative hat on in the kitchen, trying new recipes. Believe it or not, they all turned out pretty tasty. I'll be sharing them over the next few weeks. Wondering what I've been cooking? Have a look at my RECIPE BOARD on Pinterest to see some of the yummy recipes I've pinned.

Finally, I have been doing my monthly deep cleaning to make sure our house is ready for the beginning of school next month. I've also been knitting away... I'm beginning to think I'll never seen the end of all the skeins of yarn with my project list as long as it is.

My New Favorite Chocolate Cake! Crazy Wacky Cake

A perfect cake recipe for those with egg and dairy allergies. This recipe has quite a history  and it is known as the Crazy Cake. You'll have to scroll almost to the bottom of the linked page to read about it.

Yesterday was my husband's birthday; I normally make Lane's Chocolate Cake for his birthday but I did not have any milk.  So I searched for a cake recipe that did not call for milk and found THIS recipe.

Now, I do have to say this, I have become a second guesser when I read blogs with recipes because I've made several after pinning them on Pinterest and they turned out horrible. I did take into consideration that Mary baked this cake for her daughter's birthday, so I searched Allrecipes.com and found the exact recipe only it was for a full size 9x13 pan. I read the reviews and decided I would give it a go. I AM SO GLAD I BAKED THIS CAKE!

Crazy Cake/Wacky Cake

  • 3 cups      all-purpose flour

  • 2 cups      white sugar

  • 1 tsp         salt

  • 2 tsp        baking soda

  • ½ cup      cocoa powder

  • ¾ cup     oil

  • 2 Tbsp     white vinegar

  • 2 tsp        vanilla extract

  • 2 cups      cold water

Sift flour, sugar, salt, soda, and cocoa together into a 9 x 13 inch ungreased cake pan. Make three wells. Pour oil into one well, vinegar into second, and vanilla into third well. Pour cold water over all, and stir well with fork.

Bake at 350 degrees for 30 to 40 minutes, or until tooth pick inserted comes out clean. Frost with your favorite icing.

The only thing I did different ~ I mixed everything in a bowl. Greased and floured my pan, so I could take it out and frost the whole thing. Super SCRUMPDILLYICIOUS!

I used my chocolate frosting RECIPE .   

Together, this cake is HEAVENLY! 

It makes a wonderful breakfast for champions the next day. Yeah, don't judge! :)

Don't Throw in the Towels

Am I the only one who sometimes feels like a horse's patoot? Am I the only one who is given advice and then not take it? Yeah, I am stubborn like that.


Last year, I washed my kitchen towels and knitted dish cloths with a couple of microfiber towels over a couple of weeks. Let's just say I could not get my towels to absorb liquid when I needed them to after those washings. So I asked a few online friends about what to do, thinking my problem was with the cotton yarn I used to knit the dish cloths. I had several recommendations and I did not do any of them. I decided to just toss those towels and dish cloths in the rag bag and buy some new ones. - Stubborn, I tell ya!

Well, about a month ago, I noticed the towels I bought when we moved here were not absorbing water any more. Yep, I am washing them with knitted dish cloths. Nope, to the microfiber; I have not even looked at microfiber towels since my problem last summer. Now that I'm dealing with this problem again, I began wondering if there is something in the cotton yarn.

Any way, I decided to take one idea that was recommended and do a little research about stripping the towels. When I first read about boiling them in water all I could see was me standing over a huge cast iron cauldron with my long wooden paddle stirring those towels over an open fire. My imagination ran away with me, and I had to quickly reel it in.

Several online places talked about boiling them on the stove and using boiling water in the washing machine; I also read about using bleach and vinegar. Each time, someone mentioned bleach, it was quickly pointed out that bleach only disinfects while vinegar removes unwanted buildup. Right before my eyes, I read, "detergent buildup". Yeah, I think I have found my problem. It did not dawn on me until I remembered my husband telling me the water here does not rinse off well when he is washing the truck. Ding, Ding, Ding! I now know what my problem was last year and now again.

On Tuesday, I put two pots of water on to boil and filled my washing machine with hot water and added a cup of vinegar. The boiling water went into the machine along with the vinegar and towels and *NO SOAP!*. I let it agitate for a few minutes and the towels soaked for an hour . I wish I would have gone longer, but...

After hanging the towels on the clothes line, they felt different. Before, they felt like there was a coating on them but not now. The towels are more absorbent than they were but not like new towels, so the next time I strip them, I will let them soak longer.


Fabric softener is another thing I read about. I don't use it because it does leave a "coating" on fabric. I try to hang our clothes on the line as much as possible, so a softener is really not going to work for me. I do use vinegar in the rinse cycle during the winter months when the temperature is below freezing.

Now you see why I feel like a horse's patoot. I should have stripped my towels last year instead of buying new ones.

Southern Fried Pies

In the South, fried hand pies are known as Fried Pies. Around here, they are known simply as hand pies with the only difference being, they are baked.If the people around here had a fried pie, I'm sure they would not want to go back to a baked pie.


I honestly believe EVERY home cook should know the secret to fail proof fried pies. I remember when this secret was shared with me after I spent several hours trying to make a batch which did not turn out too good. With a plate full of pies that were either undercooked or crispier than crispy I was ready to throw in the towel.


Don't get me wrong, fried pies made with a homemade pie crust are not hard to make. But sometimes, a craving for fried pies hit you out of nowhere and rolling that crust thin enough can be troublesome when you are trying to answer the call for the craving. If it is too thick you end up with a doughy dough on the inside and overcooked on the outside.


I remember how my sister was told the secret to making fried pies by a little elderly lady who was a patient at the doctor's office where she worked. When she told me about it, I was a little surprised.  I even found that Paula Deen makes fried pies this way. ~ Who knew?

I'm sure you are probably wondering what the secret is. Well, hold on to your chair because you want believe it either... CANNED BISCUITS!

In the past, I used Butter Me Not biscuits because they were recommended and they give the crust a buttery taste, which is just S-C-R-U-M-P-I-O-U-S!  I quickly learned this weekend, the stores in my area do not carry any type of butter-me-nots, so I had to use regular biscuits. I could tell a difference in the crust, but they still turned out good!

I only make my pies with an apple pie filling, and I do not use a store bought filling. I make a tiny batch from my Ball Blue Book for my pies. I'm sure any homemade or store bought filling will work and taste just fine.


You have to excuse this next picture. I was doing everything I could to not get in a hurry while cooking and photographing so I would have the direct sunlight on the kitchen counter. No, I wasn't doing both at the same time, but I was working on keeping the sticky goodness from everything I touched; camera included.


~Southern Fried Pies~


Pie Filling:
⅓ cup   Sugar
1 Tbsp  Cornstarch
¼ tsp    Cinnamon
½ -¾ cup Water
2  Apples sliced

Pour water into a pan over medium heat. Combine sugar, cornstarch, cinnamon and water. ell, and bring to a boil. Boil for 2 minutes, stirring constantly.Add apples and return to a boil. Reduce heat, cover and simmer until apples are tender, about 6 to 8 minutes. Cool completely.


Pie Crust:
1 (10 count) tube regular size biscuits
flour
oil

Roll biscuits out on a floured surface. You want them to be thin but not too thin about ⅛ of an inch. Place a spoonful of filling onto the dough and fold over and crimp with fork (pressing the edges together). Be  sure your edges are crimped or you'll end up with the filling trying to escape while the pie is frying.

Heat oil in a deep-fryer, large saucepan or use your cast iron skillet. Oil should be about 375 (medium/high).   Fry the pies, a couple at a time, 2 to 3 minutes on each side; cook until the crust is golden brown. Drain on paper towels.
 
I know someone is going to say, "We'll that really isn't a pie, since you are not using pie crust." My response would be... Not everyone can make a descent pie crust; just look at the freezer section in your local grocery store. Sometimes, time is of the essence and it's a whole lot quicker and easy to wop a can of biscuits than to spend time mixing, chilling, and rolling out a fabulous pie crust.
 

Modesty and Fashion

"It is hardly necessary to waste words over the so-called bikini since it is inconceivable that any girl with tact and decency would ever wear such a thing." ~Modern Girl Magazine, 1957


I am not one of these ladies who wear my skirts down to my ankles or extemely high necklines and long sleeves. I do wear jeans and long shorts in the summer and you won't find me in one of those new skirted swimdresses that come down to the knees. Being modest is something I take into consideration and always have. You don't have to be covered from throat to toe to be modest. I can be in fashion and still be modest.

I love both of these statements in this video... "Modesty doesn't have to be frumpy and dumpy." "You can dress modest without sacrificing fashion."
 
Be sure to listen to the part about Power and Why it has to be Itsy Bitsy.