Homemade Mayonnaise

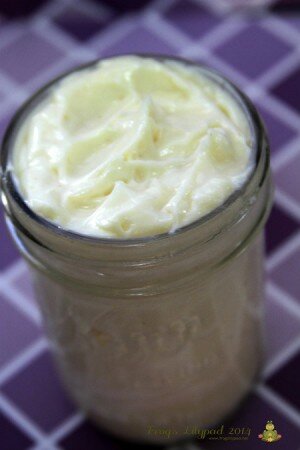
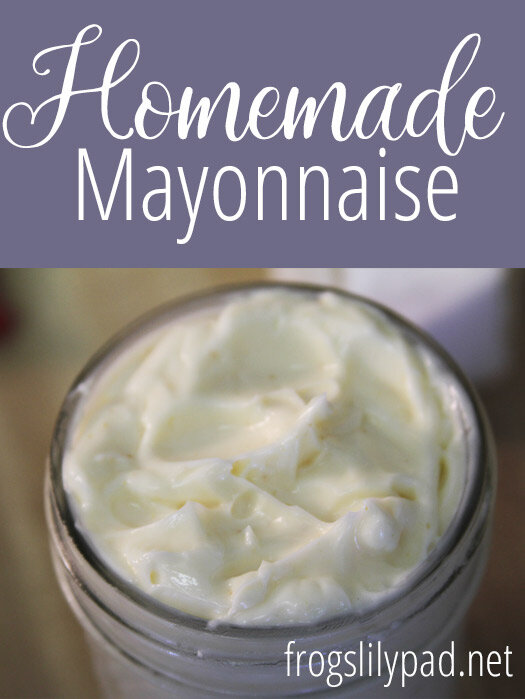
Anytime I can add an item to my list of things I won't have to buy any more, I do it. Well, I'll be adding mayonnaise to my list; a savings of $3.00 every two weeks.  Yes, we eat A LOT of mayonnaise. Jamie has inherited my love for the creamy condiment.  About five or six years ago, I tried my hand at HOMEMADE MAYONNAISE, but there was just something about it that didn't appeal to my husband, so I didn't try making again. I never liked the idea of using the raw eggs and possibly dealing with an adverse side effect. Not too long ago, I even tried coddling the egg before making mayonnaise and I still did not care for the taste. I think I will coddle the egg the next time I make this recipe to see how it does; it shouldn't do anything different except cook the egg a smidgen.


Easy Homemade Mayonnaise - It's Easier Than You Think!

My friend Tricia shared her grandmother's recipe for homemade mayonnaise. When I came across the link on Google+, I knew I had to try it, this recipe called for vinegar and red pepper. The recipes I tried and many that I've read about, all calls for lemon juice and mustard. Seriously, I don't want a mustard tasting mayonnaise although, I love mustard and mayonnaise together on sandwiches. Just a little secret about my tastes.
Easy Homemade Mayonnaise - It's Easier Than You Think!

I want a simple, tasty concoction for tuna sandwiches and our family favorite...the fried egg sandwich. This recipe is the REAL DEAL! It is everything I was not looking for, since I had given up on finding a good homemade mayo recipe.

Easy Homemade Mayonnaise - It's Easier Than You Think!


I made my mayo in the food processor, but you can easily use a stick blender or a regular blender. It is super quick, easy and mighty tasty. You won't be disappointed! The original recipe calls for all the ingredients to be chilled. Sadly, I forget about chilling everything other than the egg and it turned out well this time. I'll definitely be using chilled ingredients in the future for comparison. I did make a couple of changes from the original recipe, like cutting down on the pepper and I had to use vegetable oil since I needed to find a recipe to use it in so I could get rid of it. All in all... this is a superb recipe!

I think the hardest part to making mayonnaise is adding the oil too quickly. Be sure, to add it a drop at a time SLOWLY at the beginning. Once it starts coming together into a cream, you can pour more than a drop or two at a time.

Editing to add: I've now started to temper the egg in a bowl over a pot of  hot water. This way I can watch to keep the egg white from cooking too long.

Homemade Mayonnaise


 Ingredients:
  • 1 egg
  • 2 teaspoons vinegar
  • 1 teaspoon salt
  • 2 cups canola oil
  • 1/4 teaspoon red pepper
Directions:

Before using the egg, temper it in the shell in hot water at 135 degrees for about 1 minute. Quickly place the egg in cold water to stop the cooking process.

In a food processor bowl or a blender, mix the egg, salt, pepper, and vinegar well. Slowly pour the oil - a drop at a time to start while mixing. Keep mixing until your mixture comes together and looks like mayonnaise.


If you try this recipe let me know, and let Tricia know you tried it. I'm sure she would love to hear from you as well.


Easy Homemade Mayonnaise - It's Easier Than You Think!


The Making of Sourdough

I cater to the wants of my son. Well, not all of his wants, but when a want is something made with love in the kitchen, I always give in. Sometimes, giving in doesn't always happen immediately because I have to do some investigating. Last year, my sweet fella asked if I would make SOURDOUGH BREAD. Gulping, I knew I would be trying my hand at MAKING SOURDOUGH.

When I heard the request, I was like, "Sure thing, I'll get right on that!"  With my first sourdough starter, I was REALLY UNPREPARED. I just dumped the flour and water in a jar gave it a good stirring, covered it with cheesecloth and I watched it. I mean how hard could it be to catch wild yeast in a jar?

The Making of Sourdough


Each day I added a little flour and water. I did not realize IT WAS DOING ITS THING and got discouraged because mine wasn't growing or churning with lots and lots of bubbles like everyone else's, so I tossed it out. Quick lesson... Not ALL sourdough is going to do what all the websites, videos and photos show. Every batch of sourdough is different, because of your location. During the winter months, I read up on sourdough making and what to expect. Seriously, just about EVERY website tells something different. With all the shared information from everyone's point of view it's hard to decide on who to follow. I'll share momentarily where I did my reading.

The making of sourdough:


GIVE A STARTER-BATCH TIME -  I found that while many were stirring and feeding their starter every 12 hours, I did not have to do it except for once a day.  Your location and temperature is going to depend on how active your starter will be.  It may take MORE than just a couple of days for your starter to get to the point of being active. GIVE. IT. TIME.

In November, I came across the idea of making the starter using pineapple juice and thought, "Huh, I think I can do that." Every time I opened a can of pineapples and drained the juice, I hid the juice in the freezer. There is a family member (who will be nameless) who has a hound dog nose for pineapples and pineapple juice; both are on the endangered list in my kitchen.

The last week of April, I decided to try again at making a starter. I began the process on May 1st, so I could keep up with my days and the feeding and separating of the starter. I used a gallon pickle jar to mix it up in, I wanted to make sure I had enough room for my starter to grow without it growing over the top of the jar like a volcano. * A jelly bag works wonders as a cover.*  Also, I did not pour out any of the starter, I kept it all for my first batches of bread, pancakes and pizza dough. The beginning of May in Montana, is not too warm, so my starter was a little slow getting started. But, after three days of adding the pineapple juice with the flour to the starter, it took off and became very active.  I was one happy camper!

For the first seven days, I added flour and pineapple juice for three days and then switched over to water for the last four. If you are wondering about the pineapple leaving a flavor ~nope, no pineapple flavor.  Once the starter was on day seven, I used a cup of it to make bread. I took pictures of my bread, but they are evidently lost in the outer space of the memory card because I can not find them anywhere. In all honesty, these loaves look just like my other bread photos that are found on the blog. The only negative comment my sweet son had, was the bread didn't have the sour taste. Well, thank you very much! After only a few days, there won't be a sour taste; that taste comes with age.

After day nine I gave the starter one more feeding. After about two hours, I put a regular lid on the jar (not tight) and placed it in the refrigerator. I did not bother with the starter until Wednesday night when I pulled it out and gave it a feeding to "wake it up" so I could use it yesterday. It sat in the refrigerator for little over a week without a feeding. I covered it again with the jelly bag overnight in case it decided to blow it's top. Thankfully, it did not. Maintaining a sourdough is not chore! In the link below to Breadtopia, he explains how easy it really is.

 Sourdough IS NOT rapid:


Get ready for some slow rising breads! Sourdough does not have the rapid rise DNA, it takes its own sweet time.  Baking a loaf of bread can take anywhere from 4-10 hours and maybe longer. You read that correctly... 4-10 hours! Many bakers mix their bread dough at night for the first rising.  I like mixing mine around 6:30 in the morning and putting the dough in the oven with the light on to help speed up the process. Then around lunch time, I shape the dough and put in the pan. Again, it goes in the oven with the light on until it rises above the edge of the pan.

Baking with sourdough is not for those who are in a hurry! You have to be patient, but it is so worth it in the end.

Now for the resources I used in learning and making sourdough starter... The Fresh Loaf - everything imaginable about bread baking.  Breadtopia - another everything under the sun and then some.  Noreen's Kitchen - Youtube videos for each day of making the starter with pineapple juice.
Here's a link to my Sourdough Pancake Recipe. Because of this recipe, I have stopped making regular pancakes. This is a huge hit for our family.

The Making of Sourdough

Our Curriculum Choice for 2014-2015

I was a little scared about planning for this coming school year since it is a big one... NINTH GRADE and the beginning of HIGH SCHOOL.  After I sat down and began planning our high school years, I realized how not so difficult it would be. I didn't use the word easy in that sentence, because it was truly not that easy to plan, but it wasn't that hard either. Once we decided on what to learn, I went from there to finding the different curricula.

*This post contains affiliate links.*

BIBLE: For Bible this year, we are going with Dynamic Christian Living by Positive Action for Christ. I bought the older edition and saved a good chunk of change. We are also going to finish up Christian Theology and Ancient Polytheism by Brimwood Press. ** I highly recommend this worldview book.

MATH: We are using Teaching Textbooks Algebra 1. I can't say enough about Teaching Textbooks. If it were not for TT, I would have thrown in the towel years ago or be sporting a bald head.

LANGUAGE ARTS:  I was not planning on doing grammar this year, but after I foolishly changed my mind about switching back to Abeka English last year and many days leaving the table with a horrendous urge to pull my hair out; I am sticking to my guns and will be using Easy Grammar Ultimate Series Grade 9. We are doing one more year of grammar and then taking a break from it. We love using Wordly Wise 3000 for vocabulary. This is a program we have used for years and really like it. You can't go wrong with about fifteen words for twenty lessons. Spreading a lesson out over two weeks, makes learning vocabulary words a dream. ~at least for me!  Writing/Composition is a hard subject for me to teach! You either have the natural love for writing and it comes easy to you or you don't. Well, I have a son who was not graced with the natural love for writing. Some days, he had rather have his finger nails pulled out one at a time than have to write. We started with Jump In  this year and we really like it. Since it is basically a two-year program we will continue to work through the book and go from there. If time allows, we will move on to Write Shop.  I'm excited about Literature this year, I came across Lightning Literature and Composition by Hewitt Homeschooling Resourcing. We will be studying the American Mid to late 19th century pack.

WORLD GEOGRAPHY: I am a little reluctant about geography this year, I was hoping  to use the new high school geography being released in July, but to make a long story short, I decided to go with Apologia Around the World in 180 Days Geography. When I was researching this geography program, I was a little disappointed to find that there are NO lesson plans included. I began searching the internet to see if any one created plans of their on; lo and behold, I found Susan Bower's lesson plans that she was sharing... for FREE!

SCIENCE:  I'm  keeping my fingers cross on Apologia Biology. When we tried to work through the General Science book, Jamie begged to fling it out the door and go with Abeka. To me, that is a little discouraging because I want Jamie to be SCIENCE READY and to at least like the subject if not love it. I have had several other moms tell me once you get past the one book, it gets better. After calculating the costs of different programs and their needed items, Apologia comes out on top.

LANGUAGE: We will be using American Sign Language University's website and videos along with Dr. Vicar's Fingerspelling Practice site. After I spent several hours watching videos from different websites. I feel we will benefit the most from ASLU and the Fingerspelling site.

FINE ARTS: Jamie will be expanding his learning of oil painting and possibly watercolors. He started oil painting about three years ago and really enjoyed it using Bob Ross dvds. This year we will be focusing on lessons from Jerry's Artarama.

PE/HEALTH: Since we just finished up a half a year of Abeka health, we are not using a curriculum this year. I will be incorporating information found at 7sistershomeschool. As for PE, Jamie will be working out for bull riding and steer wrestling along with helping out on a local farm when needed.

4-H: Jamie is working through several projects in 4-H; rabbit, small engine and is moving up to shotgun sports. If you have never looked into 4-H, I recommend you at least look into what they have to offer. Working through the 4-H program has its benefits for home educated children~credit for the work and life skills. It is not a program for just animal loving, country living children; you don't even have to like animals or live in the country to be apart of the program. Life skills are taught in every thing the children work on like photography, cooking, sewing, woodworking, small engine repair just to name a few.

It looks like a long daunting list, doesn't it?

High School Plans

I can't believe I'm saying this... Our middle school days are numbered; five days to be exact. This is a little hard to swallow, not because my precious son is growing older, but because I am facing high school ~ AGAIN! Thankfully, my high school years are in the past and I never have to relive them, unless they are in a nightmare.


*This post contains affiliate links.*

I was a little worried about facing these years. We have always kept in the back of our minds during our home education journey, I would go back to teaching and Jamie attend school. At the moment, this is not an option, but if it arises in the future, it will be something we consider.

Facing high school with a boy who is not sure what he wants to do career wise, is hard! In fact, I didn't know what I wanted to do at 14, so it's natural, I guess. One thing that has helped me with this one bump in the road, is to lay the law down about college... he will attend. He may not know what he is going to major in at the moment or he may not graduate with a degree, but he will make an effort.

With us just starting out in our high school years, the one thing I can do for my son to help him succeed in the future is make sure he is PREPARED. Since I don't know what field he will be going into and working towards it at the moment, I can make sure he has all of our state's requirements and any prospective college's requirements met.

I have heard some horror stories of young people not making it into college all because they were not prepared. This saddens me because some of these young people really wanted to attend college and there was no one working to help them succeed. It is up to us, the parents, to have a plan ready for action when our children hit these important years. Whether we steamroll right through the years and reach our goal, or we hit a few snags and spend extra time achieving the goal, our children NEED must be PREPARED for college.

I have had several home educating friends who have already walked the high school road with their children, recommend to me The Home Scholar. Lee Binz has some wonderful things on her website and it is ALL ABOUT HIGH SCHOOL! I have read and reread Lee's book Planning High School Courses and, both times, I learned something new. If you haven't read the book, I highly recommend it.

The biggest thing for me in planning for high school was to make a plan for all four years; I need to know what I will be facing. I found what the state of Montana requires for graduation and then I went to our local high school's website and found what they require. From there I went to Abeka and Bob Jones, along with many of the Christian schools in our state to get an idea of what  is learned in each grade and electives. I found some interesting classes  being offered as electives throughout our state and two classes will be right up Jamie's alley. Now that I have a completed high school plan, I can focus on each individual grade and not worry about the future. Our high school plan is not set in stone, but it is something that we can work towards each year and it gives me peace of mind in knowing what we will be facing.

This is our high school plan, as for the electives, Jamie will choose which course he wants and when.  After looking at it, I feel all the excitement of starting high school.

On the Homestretch

I find it a little amusing to watch my son hunker down on his school work and complete lessons ahead of schedule this time of year. This happens EVERY YEAR. It seems just like last week, I was having to drag lessons out of him when actually, it was a couple of months ago. Now that we are on the homestretch, we have completed every subject except for math, writing a research paper and some reading. Our days don't seem quite as stressful.


I was excited when the topic of the yearly research paper was thought to be settled on William Wallace. I bought books and found websites to help aid in getting to know this man of history. Little did I know, my WWII history loving son would change his mind on the subject for his research paper after learning about the techniques of a particular fighter pilot. I was a little saddened when I heard the news that he had changed his mind and that he wanted to learn more about Erich Hartmann, a German fighter pilot.  I quickly said, "William Wallace was a man who fought for the independence of Scotland, he fought for what was right. Erich Hartmann was probably a Nazi who fought for Germany and all that Hitler stood for!"  A sweet, calm answer came back, "Mom, Erich Hartmann fought for what he thought was right, also. And he wasn't a Nazi!" That last little statement made this Momma feel better about the subject for this research paper.

I guess after sitting in a cockpit at the South Dakota Air and Space Museum last summer helped in creating a new-found love for my son.


It's hard to believe that in a few short weeks, I will have a high schooler. For the past several months, I have been planning our high school years. While I'm still tying up loose ends on a couple of electives, I have everything else planned.  Of course, nothing is set in stone because I'm sure I will realize there is a curriculum we don't care for or something new will come on the market.

I'll be sharing our curriculum choices later on this week.

Mexican Casserole

My husband knows my love for Mexican foods.  In fact, this month there have been more Mexican dishes served than normal since this has been a month of experiments with meatless recipes. Mexican Casserole is one of our favorites and my husband who never asks for something particular except for fried chicken, asked to have this a second time in a week. It's that good!

Cheesy Mexican Casserole Recipe


Anything that is of the Mexican cuisine is served with chips at our house. It's a tradition, Jamie started when he was little and that boy was on to something that we still do.


Anything this cheesy has to be good right?


Cheesy Mexican Casserole Recipe


I knew you would agree with me on the cheesiness. You know what? It is a perfect frugal meal that could be turned into something even better if you chose to put ground meat or shredded chicken in it.
No major bowl messes, everything can be mixed up in one bowl. If you decide to not make the rice ahead of time and heat the corn, beans, rotel and salsa up a little it won't take too long in the oven. How easy is that for a quick weeknight meal? It's yummy, filling, frugal and super easy. Unless you are feeding a football team or an army, there will be plenty for lunches the next day.

Cheesy Mexican Casserole

Ingredients:


  • 1 can whole kernel corn, drained
  • 1 can black beans, rinsed and drained
  • 1 (8 ounce) carton sour cream
  • 1 cup salsa
  • 1 can  rotel
  • 1 onion, chopped
  • 2 cups cooked rice
  • 16 oz shredded colby-monterey jack cheese
  • salt and pepper to taste

Directions:

Prepare rice ahead of time, so it will not be sticky.  Preheat oven to 400 degrees.

In a large bowl combine corn, beans, sour cream, salsa, rotel, onion, rice, salt and pepper and half the cheese. Mix well. Spoon into a lightly greased baking dish. Bake for about 25 minutes or until the cheese is bubbly.

How easy is that for a quick weeknight meal? It's yummy, feeling, frugal and super easy. Unless you are feeding a football team or an army, there will be plenty for lunches the next day.
Cheesy Mexican Casserole Recipe


Teriyaki Stir Fry

I'm sharing with you another new family favorite recipe... TERIYAKI STIR FRY. My friend Rhonda led me to the IDEA of this recipe. While knowing the tastes of my family, I knew just soy sauce, salt and garlic powder in the recipe were not going to win them over,so  I had to do something else. We love Chinese saucy foods, and before we moved here we had a favorite Chinese buffet that served a teriyaki noodle dish, so I decided to make a teriyaki sauce to go the noodles and vegetables. What a dish, it is dee-lish!

Since I make a SOY SAUCE SUBSTITUTE, for all of my Chinese food recipes, this one was no different. I found THIS teriyaki sauce recipe and changed it a good bit since I was using my sauce. This is one of those recipes you can use any vegetable or you can even buy a bag of stir fry veggies. This particular day, I used a bag of vegetables and a mixture of spaghetti noodles. I had a quarter of a box of whole grain noodles and just mixed it in with regular noodles.


Teriyaki Sauce

1 cup Soy Sauce Substitute
¼ tsp garlic powder
4 TBSP packed brown sugar
1-2 TBSP honey
2 TBSP cornstarch

Make the soy sauce substitute in advance and let it sit so the flavors will do their thing. Over medium heat, add all the ingredients and whisk until there are no lumps from the cornstarch. Cook until thickened.** You may want to taste your sauce while adding the sugar and honey, to keep it from being too sweet.**

Noodle Stir Fry

3 TBSP  oil
1 onion sliced
½ bell pepper diced
1 clove minced fresh garlic
Vegetables - whatever you fancy!
1 pound spaghetti noodles

In a skillet, heat oil and cook vegetables and garlic together – cooking on medium heat until vegetables tender. Boil the spaghetti noodles in water and drain. Stir cooked vegetables and noodle together. Add teriyaki sauce and stir to coat.

This is another winner for my frugal, meatless meal ideas. YAHOO!