Simple Sweet Potato Pie {day 29}

Sweet Potato Pie is one of my two favorite pies – ever. The other being pecan but my Maw Maw’s Sweet Potato Pie recipe beats pecan any day of the year. Of all the desserts that were at my Maw Maw’s house during the holidays when I was growing up, sweet potato pie was the first I always enjoyed. The yummy sweet potatoes are all I really wanted. I love sweet potatoes and could eat them every day of the year. That would be a lot of sweet potatoes! I mentioned last year about the color variation and health benefits in sweet potatoes, not only are they yummy but they’re healthy too!

A simple recipe for a Simple Sweet Potato Pie. No spicy spices included in this recipe. Just a tasteful sweet potato pie. frogslilypad.net

Simple Sweet Potato Pie


I’ll never forget my mom buying a store bought sweet potato pie. I was visiting and found it on her counter and couldn’t help myself. I was so disappointed because it tasted like pumpkin pie (I don’t like pumpkin pie), it had a ton of spices and that is all I tasted. So disappointed, I tell ya!

A Sweet Potato Pie should be simple with no added spices to overpower the sweet taste of the yummy potatoes.

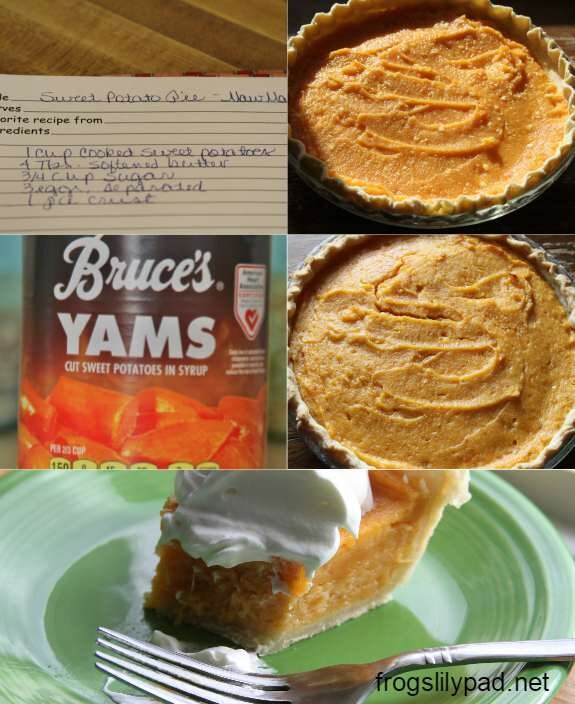
My grandmother’s recipe calls for 1 cup of cooked sweet potatoes. Over the years, I have found that a can of Bruce’s Yams (1lb 13oz) are the perfect amount to use in this recipe and when I cook sweet potatoes, I use 2-3 potatoes depending on their size. I don’t change the amount of the other ingredients.

A simple recipe for a Simple Sweet Potato Pie. No spicy spices included in this recipe. Just a tasteful sweet potato pie. frogslilypad.net


Simple Sweet Potato Pie

Ingredients:
  • 2-3 cooked sweet potatoes
  • 4 Tablespoons softened butter
  • ¾ cup sugar
  • 3 eggs, separated
  • 1 pie crust
Directions:

Preheat oven to 400 degrees.

In a small bowl, beat egg whites until stiff. In another bowl, cream butter and potatoes. Add sugar and egg yolks to the potato mixture and mix well. Fold in egg whites. Pour into pie crust. Bake for 30 minutes or until set.   (I usually bake for 40 minutes) If your crust starts to brown too much, place foil over the pie during the last minutes of baking.

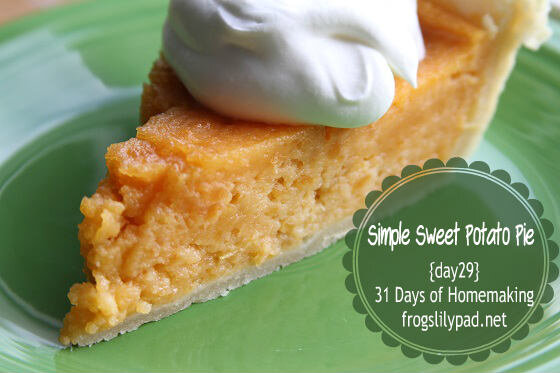
When cooled serve with fresh whipped cream.

Have you missed any days of the 31 Days of Homemaking Series? You can catch up HERE


4 Ways to a Thankful Spirit {Thankful Thursdays}

Did you know what we think about will affect whether or not we have a Thankful spirit? We live in the world where most everywhere we turn we are faced with negativity. If we allow ourselves to think on those things we will become negative. Being a Negative Nancy only pulls us down and leaves a bad impression on others. Instead of thinking on and stewing over negativity, replace it with good things; things that bring joy, happiness, and peace.


Four Ways to a Thankful Spirit


Ponder - Think about the good things in life. We have beautiful things to go on in our lives on a daily basis and we need to think on them. When we focus on the good, there is no room for the negative. Keeping a positive attitude helps in staying Thankful. (Philippians 4:8)

Share – Talking about the good things in life with others helps bring positive attitudes to those around us. Unsaved friends, family, and co-workers need to hear what God is doing for us. We may be the only Christian they will listen to when it comes to salvation. Other Christians WANT to hear what God is doing in our lives. Share it, don’t hide it.

Journal – Writing down the things we are thankful for helps us to see the good things around us. Wouldn’t it be a nice surprise for our children and grandchildren to one day read about the beautiful things God has done for us that we are thankful for? Reminding ourselves and others of those things helps keep us positive and helps create a Thankful spirit.

Praise – This one is going to be hard for some of us, me included. Praise God in everything, the bad too! When the property taxes almost triple, praise God, because it could be worse. When the water bill goes up, praise God the cost is not more than it is. We wake up with a sore throat, praise God because we could have woken up with no voice.

Removing negativity and replacing it with positive helps keep us in a Thankful spirit.

7 Chores EVERY Child Should Learn to Do {day 27}

I know what it is like to want to take control over a cleaning situation with a child, I've been there. When we take over the chore instead of allowing the child to learn, we do more damage when we stop them because it is not up to our standards or they work more slowly. Children need to learn to finish what they start and do their best in everything. By allowing them to continue working helps in the teaching process. Believe it or not, there are jobs that even toddlers can be taught to do that will help lighten our load a little. Yesterday I shared 6 Tips to Teaching Children to Clean and today I want to share 7 chores EVERY child should learn.
Giving our children chores helps them to learn how to be productive. 7 Chores EVERY Child Should Learn to Do is day 27 of the 31 Days of Homemaking Series. frogslilypad.net

7 Chores EVERY child should learn

  • Laundry {2 years+} Toddlers can learn about sorting and even help put clothes away. Older children can learn to fold and put clothes away on their own. They can also learn how to switch the laundry out from washer to dryer. By age 10, children should be mature enough to be doing their own laundry.
  • Bed {2 years+} While making the bed is not as important to many as it used to be, it is still a chore that all children should learn to do. If your child goes away to summer camp or one day lives in a college dorm making the bed is going to be needed. Children being able to arrange little critters and lovies on their bed once made gives them a sense of accomplishment.
  • Dishes {4 years+} Children as young as 2 and 3 can be taught to take their dishes to the sink. Four, five, and six-year-olds can be taught to scrape the dishes and rinse them if placing in a dishwasher. I remember standing in a chair and washing dishes at age five. Depending on the maturity of your child they can be taught how to hand wash dishes and/or place them in the washer as young as you feel safe. By age 10, children should be able to rinse and place dishes in a washer or even hand wash dishes. Of course, safety in washing needs to be taught at whatever level your child is at.
  • Dusting {3 years+} Children as young as 3 can help with dusting. A damp cloth does wonders on table tops (without breakable items) and legs, chair arms and legs. While their dusting may not pass the white glove inspection, learning to dust will help keep it under control until you can spend more time doing the job thoroughly.
  • Sweeping and Mopping {5 years+} Children as young as 5 can sweep the floor and mop depending on what type of mop you own (ex. Swiffer). Sponge/string mops and buckets of water will need supervision when in use.
  • Vacuum {6 years+} Give a child a vacuum cleaner and you may hear racecar sounds coming from a room; at least, I heard them when my son would vacuum when he was little. Vacuuming is the least favorite job of mine and I was happy to find out my son was old big enough to push and pull the machine over the carpet. Keeping carpet and rugs clean is necessary to keep them looking nice.

While these are only seven chores EVERY child should learn how to do, don’t underestimate your children if there are more chores you feel they are ready to learn. Learning to clean at a young age will help your child to be a productive adult one day. Curious about age appropriate chores? Have a look at this list found at Focus on the Family.

Have you missed any days of the 31 Days of Homemaking Series? You can catch up HERE.


Homemaker, You're Not a Maid {day 26}

One job I feel is important for me as a parent and a homemaker is making sure my son knows how to clean. I don’t expect him to clean our house, but I do expect him to keep his laundry cleaned and put away along with his room tidy. I'm not his maid.  Jamie has been given the chores of vacuuming all the floors, washing the dishes three nights a week and putting the dishes away daily along with carrying out the trash. He tends to the grass cutting, blowing the leaves, and the snow removal on the walkway. All of these chores are on top of caring for his rabbit and helping with our dog.  If there is anything else I need help with, he does it.

You're Not a Maid if You're a Homemaker: 6 Tips on Teaching Children to Clean {Day 26} 31 Days of Homemaking Series frogslilypad.net

Homemaker, You're Not a Maid

Just because we are a homemaker doesn’t mean we are the family maid. Children need to be taught how to pick up after themselves. Since my husband works very hard so I can be at home, I pick up for him. While he normally doesn’t leave things out, I do find an occasional pair of socks lying around. I trained him well. ;)

I find it disturbing when I hear a mom state she can’t get her 3-5 years old to pick up their toys. Learning to pick up after oneself isn’t an overnight miracle; it takes time and it takes training. You can’t expect them to be running amok one day and then the next day to be picking up toys. You have to train them, the earlier the better.

6 Tips on Teaching Children to Clean

  • Make Cleaning Fun. In the early stages of teaching your child to clean, make it fun. Let them see and hear you with a joyful spirit while cleaning.
  • If Sticker Charts work for you, use them to help track your child’s progress in learning to clean. Sticker charts didn’t work for us, but the penny jar did. For every chore my son did when we were starting out he received a penny. Over time, he cashed his pennies in for silver money and then dollar bills.
  • Keep the Toys and Books Confined To One Area. Don’t let the house become the playground.
  • Don’t Clean for Them. Let your children know what is expected of them and that you mean business. When they make the mess, they have to clean it up.
  •  Explain the Rules. Set rules and consequences for cleaning. Be sure your children completely understand what is expected of them and they know the consequences if they don’t follow through.
  • Be Persistent. Don’t give up on training your children to clean. It takes time - be persistent.
While your children may not be too happy with learning how to clean right now, they will one day thank you for it. Their future employers will thank you and your future children in law will thank you.

Dear Homemaking Friend, you are not a maid.  Don't fall into that trap, teach your children to clean.

Do you have any tips you would add?

Have you missed any days of the 31 Days of Homemaking Series? You can catch up HERE.

Taffy Apple Salad {Day 25}

Taffy Apple Salad is a fruit salad like no other. I found this recipe in the newspaper when we lived in western Montana. I remember when I clipped it I thought I would probably never make it since it is a creamy fruit salad. I’m not a fan of creamy, mayonnaise-y fruit salads. It took me two years before I gave this recipe a try; I cannot believe I waited so long. I guess the lasting impression of soggy creamy fruit salads with mini marshmallows from family reunions  and church dinners in the past did an injustice for the ever so famous fruit salads everyone seems to love.

Taffy Apple Salad - A fruit salad like no other. Forget about those salads with mayonnaise and mini marshmallows, this is the fruit salad you want. {day 25} 31 Days of Homemaking Series at frogslilypad.net

Taffy Apple Salad


The two things I changed in this recipe were the amount of whipped topping and the type of apples to use. A full tub of Cool Whip seemed to overtake the recipe, so I use only half a tub. The original recipe also called for Red Delicious; to me they are the worst tasting apple out there. I like a good crunchy apple with a good taste, and the Red Delicious just doesn’t do it for me.

Macintosh, Gala, and Fuji apples are our favorites to eat, so these are the apples I use for this salad. I’ve even tried the yummy Honeycrisp apples when they are at their rock bottom price. Have you tried those? If not, you need to! They are a little more on the expensive side, but so worth it.

When I made this during the Christmas holidays back home for get-togethers I leave the peeling on one red apple and add one Granny Smith to the bunch so it would give the green and red colors for the season. ~ A nice touch of color!

Taffy Apple Salad - A fruit salad like no other. Forget about those salads with mayonnaise and mini marshmallows, this is the fruit salad you want. {day 25} 31 Days of Homemaking Series at frogslilypad.net


While I normally don’t buy tubs of whipped topping, I have found that homemade whipped cream doesn’t hold up like the store bought for this recipe. – Just something to think about.

The original recipe calls for peanuts and I personally love how the peanut flavor works with everything else, but I have also used pecans and walnuts. So use whatever nuts you want.

Taffy Apple Salad

Ingredients:
  • 4 cups apples, peeled and diced
  • ½ (8 oz) carton whipped topping
  • 1 8 oz can crushed pineapple with juice
  • 1 Tablespoon flour
  • 2 Tablespoon apple cider vinegar
  • ½ cup sugar
  • 1 egg whisked
  • 1 cup chopped peanuts
Directions:

Dice apples and give them a quick soak in some lemon/vinegar water to keep from browning and drain.

Place apples in a large enough bowl for mixing everything together.

In a medium pan mix sugar, flour, vinegar, egg, and pineapple, cook until thick. Let cool.  When letting the pineapple mixture cool, I don’t let it cool completely. This will help the cool whip melt a little and not be so whippy.  When cool, add peanuts and whipped topping and mix well and pour over apples. Mix until the apples are coated. Refrigerate until serving.

The longer the salad is refrigerated the better it tastes.

Have you missed any days of the 31 Days of Homemaking Series? You can catch up HERE.

Preserving Foods {day 24}

Preserving foods to save money doesn’t have to be like the old days of carrying meat to a smoke house or standing over a hot canner on a stove for hours on end. Canning all my vegetables is something I have missed the past 3 summers since we don’t have a garden spot. Even without a garden, I still manage to do a little canning. Not having a garden and fruit trees or vines doesn’t mean you can’t preserve foods for your family.
Preserving Foods doesn't have to be dependent on a garden or and orchard. You can preserve store bought items for future use. 3 ways I preserve foods. {day 24} 31 Days of Homemaking Series l frogslilypad.net

{affiliate links included}

Preserving Foods

I’ve mentioned buying in bulk several times in the past. When our local grocery store has certain produce in the special fill a bag for $10, I fill that bag slap full of what I’m needing. Twice in the past two months they had all colored bell peppers in the special. Around here orange, red, and yellow bell peppers are anywhere from $2-3 a piece. The last time we bought a bagful we ended up with 20 bell peppers in the bag.

 My 3 Favorite Ways to Preserve Foods


Freezing – our biggest way of preserving right now is freezing. I have several bags of diced and julienned sliced peppers from my past sale finds. Anytime I buy meat on sale, I freeze it. In fact, if I buy a large container of ground meat for several dishes, I cook it all at once and then separate it into bags to be frozen. Baking ingredients like flour and yeast can be placed in your freezer to keep over time.

Canning – while I don’t get to can as much as I would like, I am still able to put a few things in the canner for use later on. When I catch canned tomatoes and tomato sauce on sale, I stock up and make homemade salsa, pasta sauce, pizza sauce, and enchilada sauce.

  •  Jelly – Did you know you can make homemade jelly from a bottle of store-bought juice? You can and you can’t tell the difference either. In fact, it’s a whole lot easier than juicing your own fruits. For me, I normally by Welch’s grape jelly because it’s pretty inexpensive here, but if I have a hankering for apple jelly, I’ll make my own using bottled juice. While I haven’t used Pomona Pectin, I have read some really good things about it, like it will gel plain water. It’s being added to my grocery list because I have a sneaky feeling about some of their jelly recipes being tasty.

  • Pickles – my sister told me how she buys cucumbers, slices them and puts them in store bought pickle juice. After a few days, they become pickles. On my next shopping trip, I am planning on buying a jar of pickles and cucumbers to give this a try. I’ll let you know how it turns out. Even making homemade pickles are easy now days because of the quick method pickling from Ball. You don’t even need a pressure canner to make pickles, a water bath canner is all you need.

Drying – one of my favorite ways of preserving foods is by loading up my dehydrator my husband bought me. I love this thing! Dried banana chips are my favorite. Dried sweet potatoes are my little Mickey’s favorite treats and they are healthy for him too. Hopefully this year, there will be deer to turn into jerky for my jerky loving men. Eww! not me - jerky that is, not deer.

Just because you don't have a garden and orchards, you can still preserve foods for your family. Do you preserve foods and what are your favorite methods?

Have you missed any days of the 31 Days of Homemaking Series? You can catch up HERE.

Financial Tips for Homemakers {day 23}

Wouldn’t life be grand if we didn’t have to rely on money and budgeting? I think it would a whole lot easier if that part of life didn’t exist – I think. I want to share some Financial Tips that we quickly put to use after we were married and have learned over the years. You know, finances are one of the top reasons marriages end in divorce. Committing to spend the rest of your life with another person means there will be compromising. Your finances are one area where there will be a compromise.
Five Financial Tips for Homemakers. Every couple needs to communicate when it comes to finances. Here are 5 tips for homemakers when it comes to finances. {day 23} 31 Days of Homemaking Series l frogslilypad.net

Financial Tips for Homemakers


Accountability – It takes two to tango, and it takes two to create a budget. If something goes wrong, blaming the other person can’t be done. Being accountable teaches responsibility and self - discipline. Ladies, don’t fall into the “my husband takes care of all of that” trap. We’ve all heard of women being left behind because of a death or a divorce and they were up to the eyeballs in a financial mess and didn’t know anything about it. Communicate with each other often about the budget and finances; keep each other informed.

Purchase Limits – We are probably the only couple who does this. I NEVER make a purchase (groceries aside) over $15 without letting my husband know beforehand. This works for us and has for many years; I started this during my transition to being full time at home. It took my husband a little getting used to when I’d let him know because he didn’t want me to think of him as a dictator over the checkbook, but in the end it really works for us. There is nothing wrong with me making a purchase, but knowing about it before working on the checkbook is something he likes.

Organization – Find a system that works for you and use it. Being organized with the bills and other important documents keeps the sanity for both husband and wife. When an emergency arises having everything in place and current helps when dealing with those brain fog moments.

Goals – Setting long and short-term goals together help in achieving those goals.  Sharing with each other what you want and dream of is important for future plans.

Communicate – Marriage is a partnership. When we communicate with our spouse they are not left in the dark about things. It’s a sad situation when a spouse has no liberty to speak their mind; it’s even sadder when the other clams up and won’t speak. Communication, it’s a two-way street.

In each of those tips there is one thing that is common, do you know what it is? If you haven't guessed, it is communication. You have to be open and communicate with each other so there will be no stress over your finances.

Do you have any tips you would include?

Have you missed any days of the 31 Days of Homemaking Series? You can catch up HERE.